Terraforming – Bushido style

I was in Chinatown over the weekend with the family, and I picked up a handful of the little red Buddha figurines, thinking that they may work quite well as objectives or just straight up scenery for Bushido.

A mere $6 later and i’d picked up these little fellas. I washed them in warm soapy water and then based them up with some cork and MDF bases I had kicking around:

After the glue had dried, I textured the base with some modelling pumice and left overnight to dry (I prefer using this than the PVA/sand option, as I feel this has more resilience).

A quick blast with some grey car primer and a wash with some Agrax Earthshade, then random washes of the GW green wash (forgot the name!) and we’re on the way:

I used a splash of green to simulate the weathering and discoloration of stone through being left out in the elements. I didn’t want to get too crazy with the paint job on these, just something quick and easy. I grabbed a couple of different shades of grey and drybrushed the little fella, followed up with a last light drybrush of white.

After painting the soil and drybrushing that up too, I hit the base up with some static grass and added some flowers, and voila! a quick piece of terrain to dress my Bushido board. I’ve put my Cult of Yurei Ikiryo figure next to it for size comparison. I didn’t want a huge statue, just something that could be like a roadside shrine or something.

I can’t wait to get the Bushido board finished!

Cheers!

Golden Demon – the Beginning…

Huh, kinda sounds like the name of a kick ass Kung Fu movie in the vein of Crouching Tiger, Hidden Dragon etc. Nice.

In the wake of me being a little bit excited that Games Day/Golden Demon is back in Chicago this year, I decided to actually participate in Golden Demon this time around. I didn’t want to spread myself too thin and try and enter a bunch of stuff, so I picked 2 things I thought would be fun to have a go at. First is a 40K Nurgle chaos lord and second is going to be a Forge World venerable dready in Salamander livery. I’m a little nervous about entering, as I have seen what I’ll be going up against in past years, and I guess I’m a little underappreciating of my work sometimes. But, what the hell, even if I get an honorable mention, it’ll be worth it.

A week or two back, I saw a great article listed under the Int’l House of Paincakes ‘Weekly Top X’ which had a link to Brian’s blog ‘Roll With It’ and a rather splendid article on how to ‘Nurglize’ yo’ stuff. It gave such a simple way of making your plastic CSM mini’s look pock-marked and corroded. It helped sway my decision about doing another chaos lord, particularly a Nurgle one. Hopefully I’ll be able to do Brian some justice when applying this method. We’ll see!

Assembly has already started on the lord. Here we see the bare bones (pun intended), before going at him with a hot pin or two, and any GS-ing I will be applying:

I had the Typhus head kicking around in a bitz box, as well as the rather’detailed’ torso. I ordered the shoulder pads especially for the project from Ebay. I wanted to keep him relatively modest, no cloaks, rows of trophy racks etc, as I feel it will give me more to play with when it comes to GS-ing and painting.

The dready is still in bits right now, but he has been cleaned up and washed, ready for assembly. I’ll post up more as and when I get more done.

C+C most welcome.

cheers!

Nurgle lord – the end is in sight! (maybe)

I can’t believe that I hadn’t posted these, or maybe I had, but I couldn’t find them…

Anyhoo, to kick off 2011, our first contender is a WCF veteran, as he’s been on here from the start, my Nurgle Lord. I tend to do a little, and put him away, then come back and do some more… still, he seems happy enough, belching and farting in my gaming closet… This year, though, I’m aiming to have more completed stuff posted and not just dribs and drabs. This guy, though, is the exception. He didn’t do too badly in a game I had just before xmas either. yay!

You can see the PP ‘Bloodstone’ base that I use for the basis of my rusted metal here.


A brown ink was over the bloodstone gives it depth…

Boltgun metal, chainmail highlights and some chestnut ink to finish the job!

He’s getting there! Another couple of hours should get the job done. In the meantime though, I am working on my Black Templars Rhino.

Black is such a pain in the arse to paint >sigh<

TTFN

Paul

Ding dong merrily on high! on Terra the shells are ringing!

Indeed it is fast approaching that time where the big fat dude in a red suit empties his sack down your chimney. Oh, and also Santa should be putting in an appearance too. I’m hoping that he’ll be bringing me the Forge World stuff I asked for, else I’ll set the Inquisition on his ass for use of witch power and xenos technologies.

This may be the last post I do for a week or so, as the preparations for the holidays are sucking up all my spare time, and then the day after xmas I will be hauling the family down to America’s Wang (apparently the affectionate name for Florida…) for a mini vay-cay and also to take my son to Disney…

So, first up for this one:

Land Raider Loadouts.

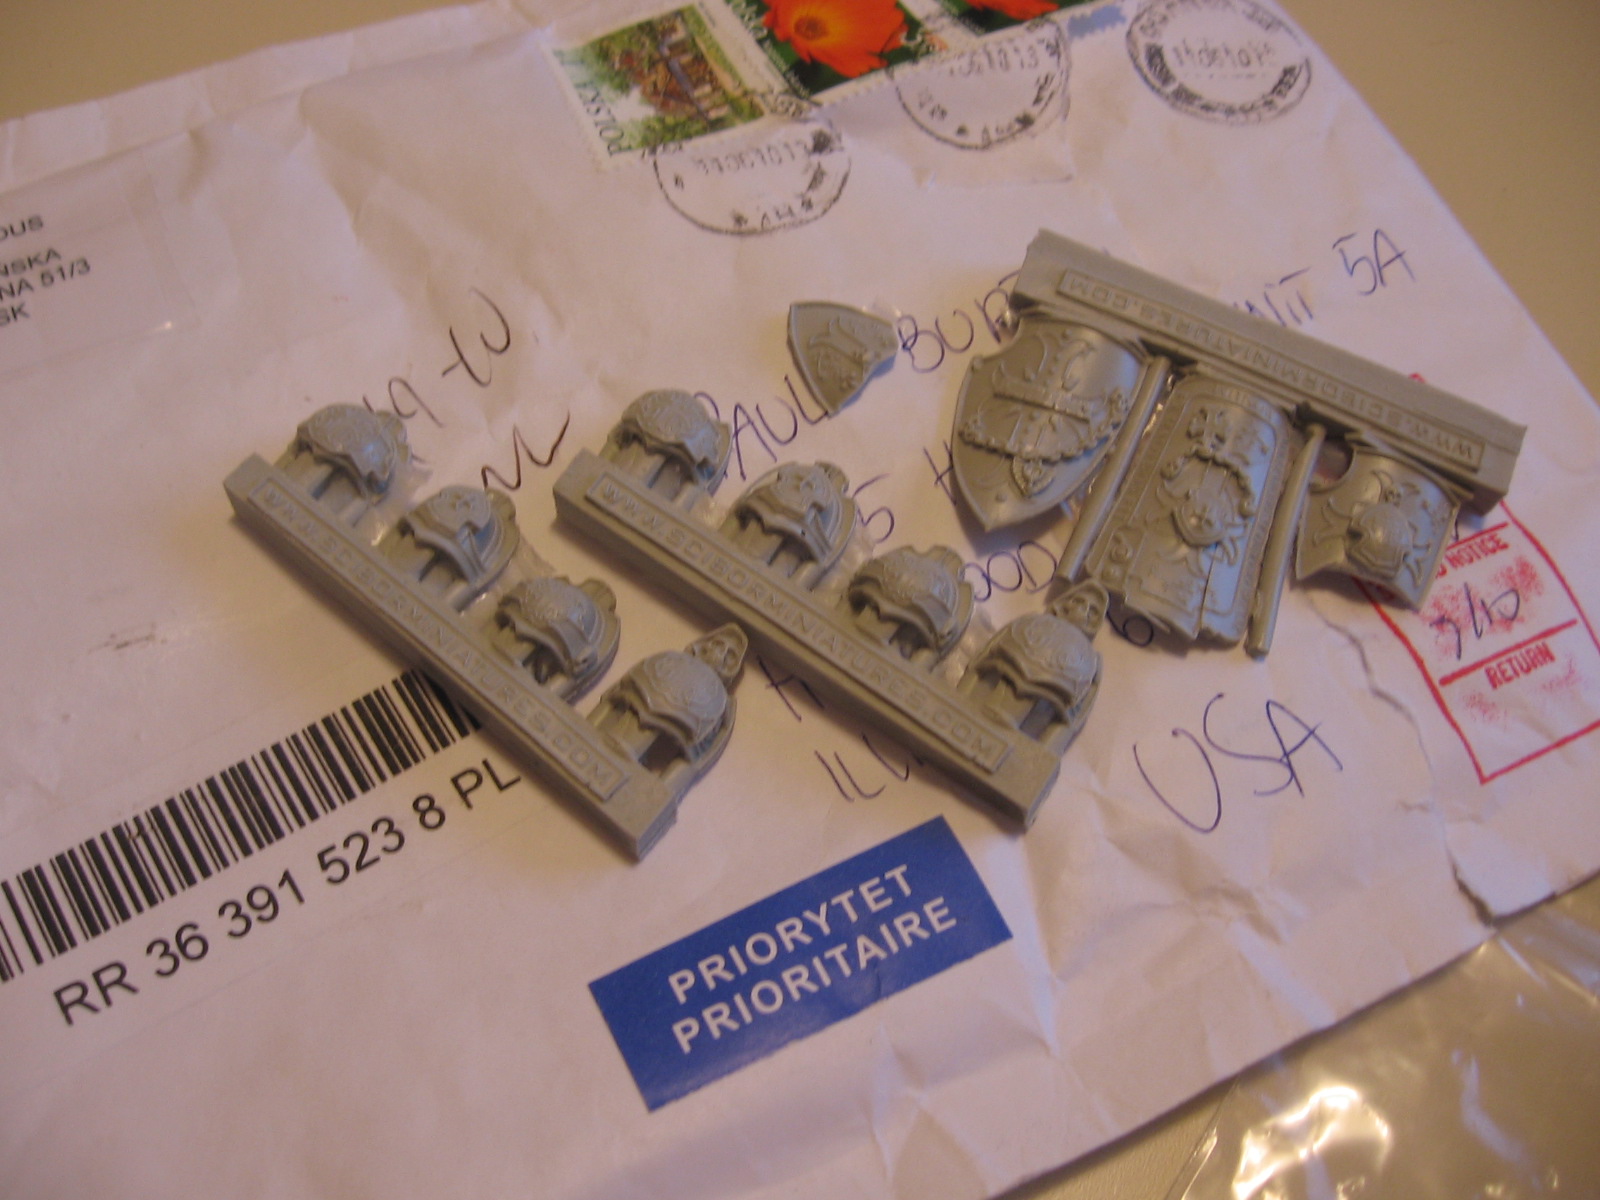
I have been having a spirited (but very friendly) discussion with my compadre back in the UK via email about Land Raiders and the positioning of sponson loadouts. It started initially by me telling him about some sweet armor plate upgrades that I purchased from Scibor’s Monstrous (which you can see here ). I wasn’t too sure where they were meant to go, but they do seem to fit quite nicely on the front quarters of the Land Raider, just forward of the sponson mounting.

Cries of ‘Heresy’ soon were abounding when I told him that my gun loadouts are positioned on the doors nearer the rear of the vehicle. When he was asking me where I had put mine, it made me wonder if I had cocked up when I was building the kit. Nope, the instructions show that, as do the images and diagrams in the Codex. Now i’m aware that just because the pictures show this, doesn’t mean you have to have them there, and I see plenty of pictures on teh interwebs with them on the forward quarter doors. In my honest opinion I think that they look freakin’ ugly and front end heavy with them like that.

His point, which was well made, was that surely troops embarking/disembarking would get shot to shit as they would be getting  out of  the vehicle right in front of the loadouts, and that having the armament on the forward quarter doors offers a little in the way of protection and cover for troops embarking the vehicle in the heat of battle. My counter to this was that as I use my LR primarily as a vehicle to get my assault terminators around, and couldn’t see marines in tactical dreadnaught armour trying to squeeze their asses out of those side doors when they have a bloody great assault ramp to charge down. I see those doors for getting into (before entering the combat zone), more than out of, but that could be me being pedantic.

A number of ‘real life’ examples where brought to the table by my buddy, who is a total treadhead at heart,and the points he made really did make sense.  I guess I am sacrificing practicality over vanity. I also mentioned that real world physics mean little in 40K (I can see Dethtron rolling his eyes right now) and to try and rationalize some of the things in the 40K universe would probably give us a nosebleed.

So what are your thoughts, dear readers? Front quarter loadouts or rear quarter? does it even matter? I’d be intrigued to hear what you’ve got to say.

Black Templar Marshal

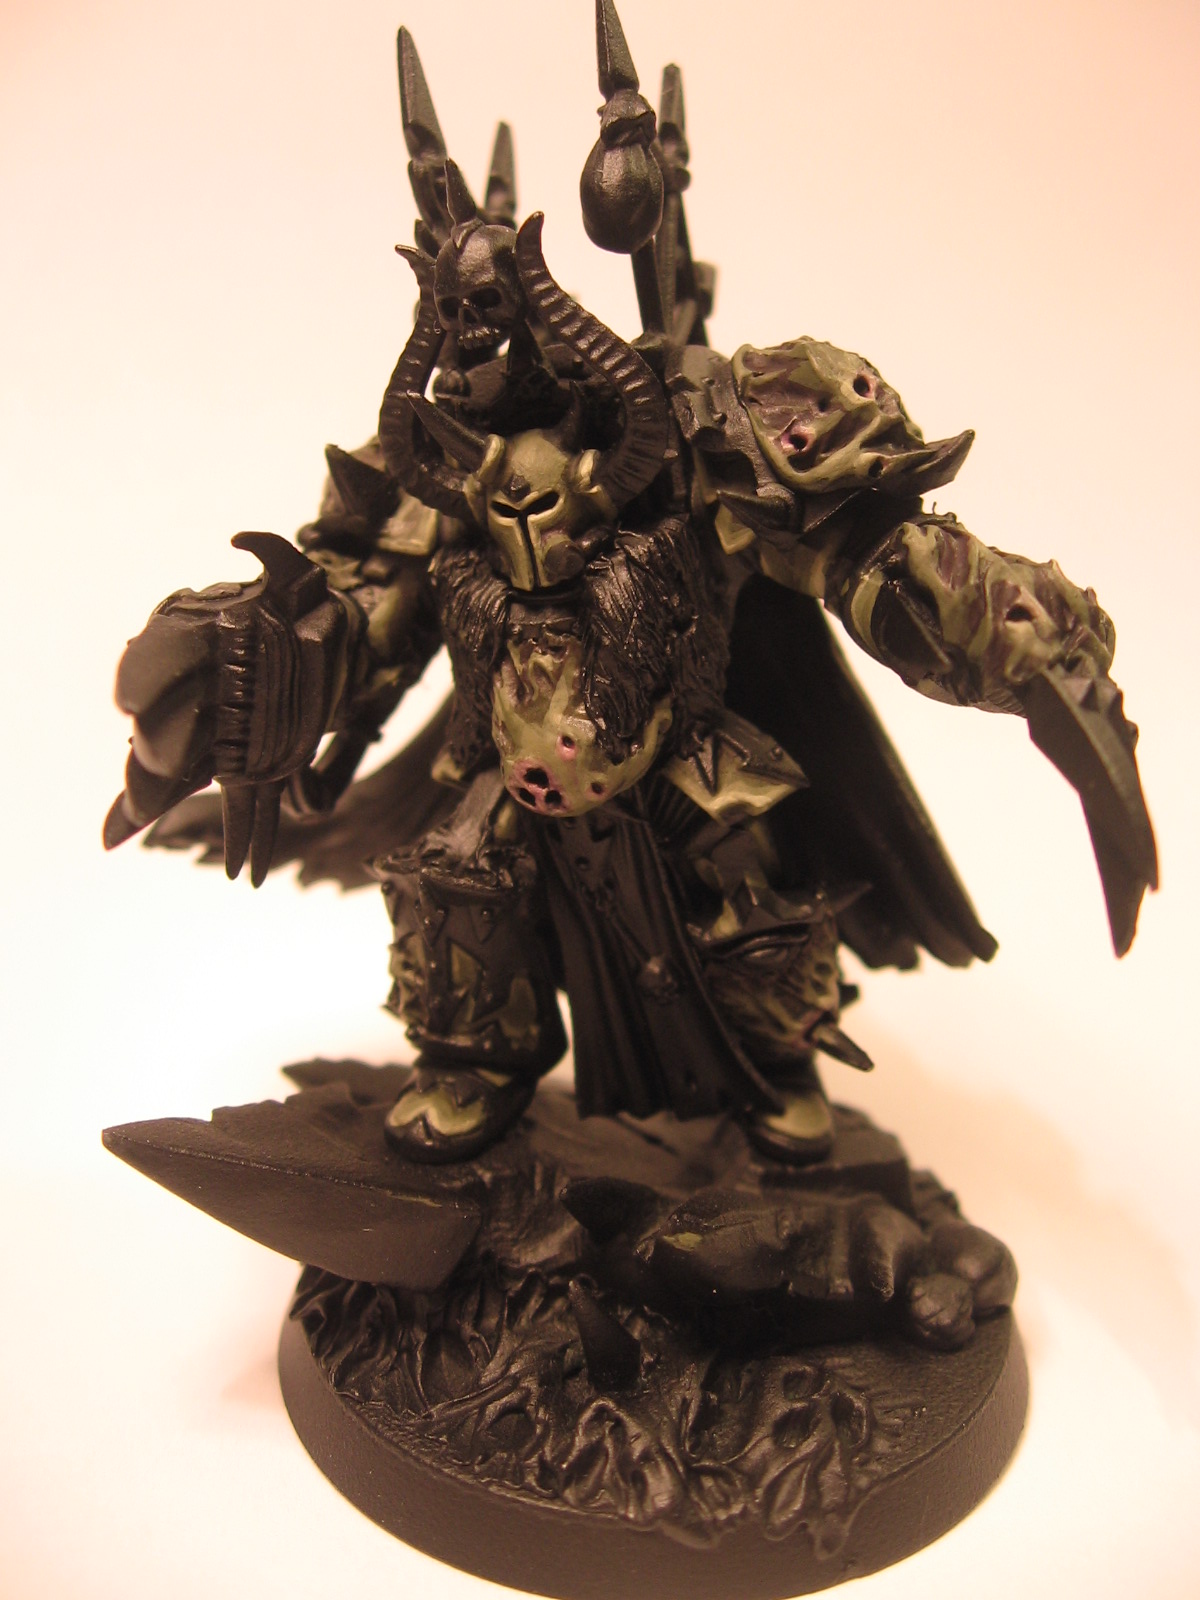
Amongst other things I have been tinkering with, I mentioned in my last post that I was going to convert a mini into a Templar Marshal, and showed you a sketch that I drew up. Well, I’ve been working on this chap, and here he is, ready for a little green-stuffing here and there, then some paint!

I still have to mess with the base as well, but I wanted to show you the fruits of my labors so far. I’m thinking i’d like to add a chain around his left fist and wrapping it around the shaft of the weapon, like the other Templars do. I’m a little apprehensive about modelling chain, but i’ll give it a go! It’s been a lot of fun seeing this chap develop from a sketch into reality. I think he seems to have a slightly haughty air about him, which is befitting of the chapter. I may well convert some more and have them as his command squad, we’ll see what happens with that.

So thats it for now. I may try and get another post in, but if I don’t, I’ll see you all in a week or two, so have a safe and happy holiday and make sure that you eat and drink lots!

TTFN

Paul

Product review – Scibor Monstrous Miniatures

Product review – Scibor Monstrous Miniatures.

I happened upon this company some time ago when I saw some one off custom Primarch sculpts they had produced. I was also very interested in the excellent sculpting articles that they have too (check them out!) Scibor appear to be a small independent company based in Poland who are relatively new to the marketplace. They seem to be gaining a lot of momentum with their own lines of Dwarves, Goblins, priests, beasties and conversion bits (amongst a plethora of other products), and it’s easy to see why people will shop with them. Quite simply, their products are great!

I had been meaning to purchase something for a while, and with me wanting to personalize my Black Templar forces, I figured Scibor would be the place to start. I placed an order on their snappy and rather slick looking website for some ‘Big Templar shields’ and some ‘Templar shoulder pads’ to get the ball rolling. The ordering process is nice and simple, and they accept PayPal, which is also very convenient. The prices are very reasonable, and the standard of the detail means you’re getting a pretty good deal all round. After my order was placed I got a confirmation email from them, which unfortunately I couldn’t understand a word of, due to the language barrier, but I got the general gist of it.

It took about a month for the order to get to me, which is not so great, but then it is coming from Poland, hardly just down the street! I did notice on the site it says they mail out orders seven days after receiving payment, and that it takes two to three weeks for delivery.

After receiving a ‘final notice’ slip from the post office (even though it was the first one I’d received, weird!) I picked up my order. It had been sent in a small bubble pack envelope, which was pretty flimsy. Inside were two little baggies, one with the shields, and one with the shoulder pads. Two of the shields had been broken, which I am sure is a result of USPS taking their upmost care in handling packages, and also a chunk had snapped off one of the shoulder pads. This was disappointing, especially after waiting for a month for it to arrive.

Initial disappointment aside, it was nice to get this stuff in hand to get a good look at it, and I have to say, it’s really nice quality workmanship. The resin that it’s cast in feels quite substantial and pretty heavy duty. The breaks were clean, so I’m sure I’ll be able to repair them with no problem. I’m looking forward to having some plastic Sword Brethren now!

So, in summary:

  • A great company with some really nice products.
  • Some incredible sculpting talent.
  • Some nice tutorials!
  • A little slow on shipping (but this is a variable that you can’t control unless it’s through a carrier like UPS or something).
  • Scibor could take a leaf from Forge World’s book on shipping. Ship breakable stuff in boxes, not mailer bags, with plenty of cushioning, if you have to charge more for shipping to do so, do it! People will still buy your products!

I’ll give Scibor 3 ½ mortar shells out of 5 for now. I will be purchasing more from them soon. In the meantime, check out their website at:

http://www.sciborminiatures.com/

Chaos Lord WIP and Black Templar

I thought I had already posted these, but a quick look revealed otherwise. I have been slowly working on my Nurgle Lord, playing around with the corroded metal. I think I have found a way that I am happy with, although it may get a final wash to dull it down a little. I’m undecided as to what color to do his cloak. Maybe a deep, worn red? I even thought about possible a dirty, off-white, maybe a remnant of his former days as a Death Guard under the Emperor. Any suggestions?

and here is my first completed Black Templar, not too much to say except, err, wibble. 🙂

Well, thats about it for now. Stay tuned, and please, join up with Chamber Militant!

Cheers

Paul

Nurgle Lord WIP! update

OK, just a quickie before I go out for a game of 40K. I started on my Nurgle Lord the other night. I think i’m pretty happy with the armor color, but I want to experiment with some washes as well, check it out:

Hopefully I’ll get him finished this week. I’m pretty happy with how the helmet looks and i’m glad that I added the extra horns, as it makes him look a little more plaguebearer like.

Cheers!

Completed! the AoBR Dready!

By the Emperors Y-Fronts I thought this thing would never get finished! I estimate 10-15 man hours spent on this, from sprue to the finished item. It totally made me sure that I would NEVER want to paint another AoBR dread, EVER!

So, here it is! C=C welcome!

WIP – AoBR Dreadnought – Black Templars

I have started working on my Black Templars Dreadnought. I had already painted the one arm, but was not happy with the highlighting, so I went over it all again last night. I only painted a small part to get a feel  for the black highlighting process. Now that I have a formula I am happy with, I will continue with the rest of it. In the meantime, here is what I have done:

I’m pleased with how he’s looking so far. However, that being said, I don’t think i’ll ever want to paint another AoBR dready, as there is something about it that makes it feel like a toy more than a model. The plastic its made from seems harder and more unforgiving than the regular boxed sets. More to come!

Paul