In honor of the new, and rather delish Tomb Kings release last weekend, I wanted to post up a ‘how to’ article on painting up your undead forces in double quick time in readiness for battle.
As you may have seen in the current issue of White Dwarf, they give you some ideas for different techniques for painting your skeleton warriors. They look great, but are rather in-depth, probably too much so for those of you, like me, who are not only a full time computer masher during the day, but also a full time dad and part time rock star. My point being, you don’t have too much free time to paint.
Part the first:
Once your skellywags have been assembled (arguably the most time consuming part of this) you’re going to want to spray undercoat the little buggers. I’ve used Duplicolor Sandable Primer, matt white, which costs about $6 from any auto store, and is far superior to the expensive shite that Games Workshop tout as spray paint. I leave them overnight to dry, although they are dry to the touch in a few minutes, but I’m usually doing something else, yay for multitasking.
You should be looking at a nice, white skellie, yes? Good, then we can move onto…
Part the second:
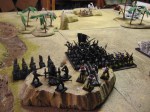
Get a pot of Devlan Mud*, insert your wash brush, or other larger brush, then liberally slap it on all over the mini. I tend to do a second coat on things like the face and ribs, as they have the most detail. Try not to pool it if possible. Set aside to dry. I have been working on a unit of horse archers, as you can see. The GW washes dry, so by the time I have washed one, moved on to the second, the first is already dry. You’ll already start to see things taking shape, thus:

Some of you out there may choose to stop at this stage, which is fine, but they still need to pop a little bit, IMO. This leads us nicely into…
Part the third:
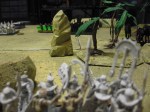
This is where your little creepers will come to (un)life. Get your brush that you use for drybrushing, open your Bleached Bone paint and drybrush them. This will give that extra dimension to them (whoah! 3-D!). It’ll pick out the ribs and facial features a little more, plus give them a little more ‘dry’ and sun bleached feel. You could even add another drybrush step here with Skull White, which I did, as I do it on just the face and ribs, very lightly:

The bone parts are done! Simple, eh?
Part the fourth – details:
You’ll still need to paint your quivers, bows and other bits after this, but again I keep it simple. For the bows I use a Mechrite red base, washed with Devlan Mud. The quivers with Hawk Turquoise washed with Devlan Mud (this is to give the overall feel of wear and dirt over a couple of centuries). The quiver flap and straps are base coated in Chaos Black, and a quick line highlight of Greatcoat Grey (PP3) and then Codex Grey . DONE! You can add details like hieroglyphs and what not, but the aim of this is to be quick, right?
Part the fifth – finishing touches:
Base ‘em! I use a pumice filler for the bases, as it looks like that dry, parched desert ground. Once it’s applied then dried, it’s basecoated with Snakebite Leather, then drybrushed with Bleached Bone, then a little bit of Skull White. Add a couple of tufts of desert flock and you should have a nice looking painted unit, ready to deal some serious arrow violence on your enemy:


Following this should get you your mass troops done in next to no time, allowing you to spend a bit more time on your character figures.
Let me know how you get on – good luck!
*I just bought a new pot of Devlan Mud the other day, as my other pot had run out. To my dismay, I find that it’s a slightly different shade, and almost looks like it’s got either Ogryn Flesh or Gryphonne Sepia in it. Bollocks!
41.850033
-87.650052


